Image Map

Tuesday, July 23, 2013

Monday Made It (a day late!): Kiss Your Brain

I’m currently enjoying a fabulous family reunion with my dad’s side of the family. We are staying in a gorgeous mansion that was originally built by Mr. Warren. My family is so large that we are occupying both the main house as well as the carriage house. Our days have been spent lounging on the beach, swimming in Lake Michigan, shopping and golfing while our nights begin with delicious dinners and end with games and bon fires on the beach. The house is located right on the lake with over 200 feet of beach frontage. The remote location of the house means cell phone and internet have been nonexistent, thus my tardiness in posting this week’s Made It Monday. I had to drive to a tiny grocery store on the side of Broken Arrow Highway where they are kind enough to let me briefly utilize their internet to post this.


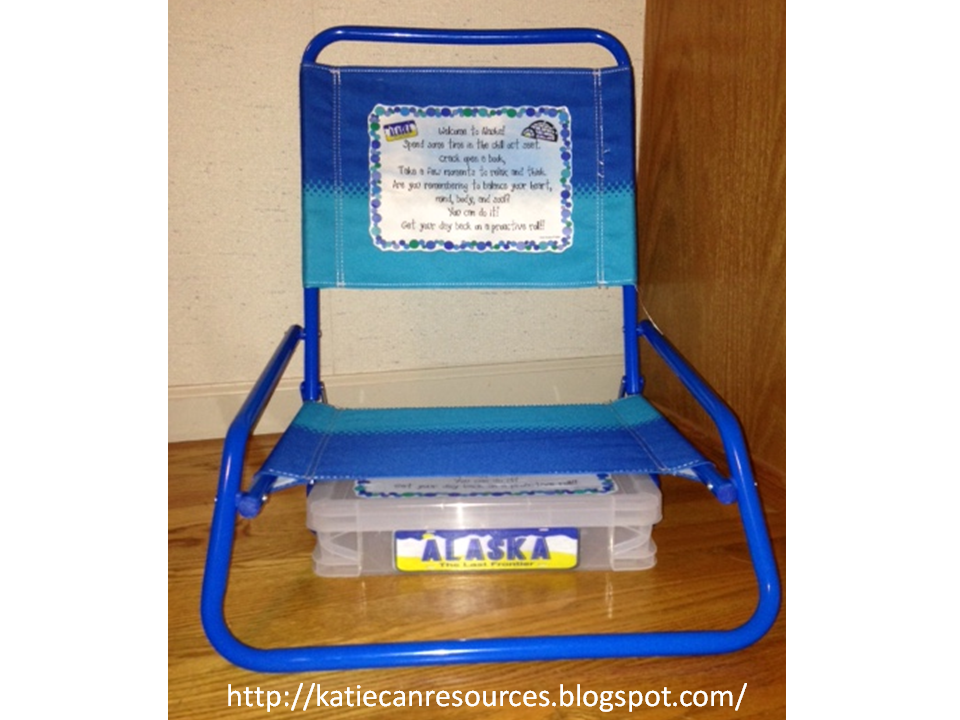
Pinterest is full of different versions of the “Kiss Your Brain” container. When I went about creating my own little version, I wanted it to be something that I could quickly and inexpensively make.
My first stop was Hobby Lobby where I grabbed some scrapbook stickers in the shape of lips as well as colorful alphabet stickers. Then I headed to Target to buy a clear container as well as large bag of Hershey Kisses. All together I got the supplies for less than $20.
The creation of my “Kiss Your Brain” container took less than ten minutes! I simply put the letters on the container to spell out Kiss Your Brain and then added the lips. Finally, I put in a large bag of Hershey Kisses. I found that my container was actually large enough to house two of the Hershey Kiss party bags.

When school begins this coming year I plan to use the “Kiss Your Brain” container as a way to reinforce student participation. Over the years I have come to realize that positive reinforcement of some type encourages students to answer and more fully participate in class. What better way to provide that reinforcement than with chocolate! Plus, I love chocolate and find myself needing the occasional piece so my “Kiss Your Brain” container will surely be put to good use!

Once again I would like to thank Tara from 4th Grade Frolics for allowing me to link up with her for Monday Made It.

Monday, July 15, 2013

Monday Made It: Alaska Chill Out Spot


Have you ever had a student that just needed a moment to “chill out” so that he or she can refocus and turn their day around? I most definitely have had several students of this nature. I saw a post from Made In The Shade In Second Grade about an Alaska Chill Out Spot where she sends her kids when they need a moment to regroup. I took the idea and gave it my own personal twist.

I work at a school that teaches our students the 7 Habits so I knew I wanted to incorporate the Habits into some sort of a chill out spot. As a result I came up with a short poem which I printed on a sheet of dark t-shirt iron-on paper. I then ironed the poem onto a beach chair that I got really cheap at Target.
 

Next I printed another copy of the poem on paper and Mod Podged it onto the top of a container. This container will be stored underneath my Alaska Chill Out Spot chair. Inside of the box I will keep books that students can read while they chill out and regroup. All of the books will be books we have read together as a class and discussed how the 7 Habits are exemplified throughout the books.
 
 
Do you like my version of the Alaska Chill Out Spot? Hop on over to my Katie Can Resources TpT store and download it as a FREEBIE! J


Many thanks to Tara over at 4th Grade Frolics for allowing me to link up with her again for her Monday Made It. Take a few minutes to check out what other fabulous bloggers have made!


Monday, July 8, 2013

Monday Made It: Share Chair


I am very excited to link up with 4th Grade Frolics for the very first time for my Monday Made It post.


There are many different versions of the “Share Chair” that can be found on the internet. As I was talking with my friend and colleague, Renee, we decided we wanted to have Share Chairs in our classrooms this coming school year. However, we wanted to make the Share Chair special for each subject we teach.

Renee and I decided that the easiest way to change the chair for each subject we are teaching is to embroider on pieces of fabric the various names we came up with. Once we came up with the names to make the Share Chair special in relation to each subject, we then grabbed some fabric, ribbon, paint brushes and acrylic paint from the craft store. Then we picked up a pair of chairs from Goodwill.

Our first order of business was to sand and then prime our chairs. Once the primer was dry, we unleashed our creativity and literally spent a leisurely day painting.

Since the painting took an entire day and I had to head up north to Michigan for a wedding, Renee graciously volunteered to make the flaps that can be changed based upon the subject we are teaching. Our plan is to make a classroom job that has a student flipping the fabric to the subject we are sharing.


As you can see, this Monday Made It project took several days and some help from a fabulous friend. I think it was time well spent. Renee and I cannot wait to have our students use these Share Chairs this coming school year when they are sharing their work with the class!


Before I sign off for the night I want to ask you to take a moment to follow my blog on Bloglovin. Thanks! 

Sunday, July 7, 2013

Field Trip to the TOP of the Mackinac Bridge


Talk about a once in a lifetime experience!
 

This past Monday started out just like any other Monday during the summer. I was enjoying a cup of coffee and hanging out with one of my best friends and her family. Then the phone rang informing us that a relative, Steve, had arranged for us to have the opportunity to go to the top of the Mackinac Bridge. We quickly kicked our rears in gear and literally ran out the door. By ten-thirty in the morning we had crossed the Mackinac Bridge and pulled over to the Mackinac Bridge authority parking lot where we met up with Steve.

Our first order of business was to sign a liability waiver. Then we each donned a fashionable yellow vest and climbed aboard a Mackinac Bridge Authority van. Once inside the van we crossed the bridge back to the lower peninsula and then turned around and began to cross the bridge headed towards the upper peninsula. The northbound lane of the bridge had been shut down by the first main tower so that we could safely exit the van and enter the main tower.
 

After we exited the van, we split into two groups. Ross and I chose to be the first to head up with Steve, while Mamie and Wayne came up second.  It is certainly a good thing I went up first with Ross and Steve because if I had stood on the bridge under the tower very long and had the chance to truly contemplate how high we were about to go, I most likely would have chickened out had I been given the time to contemplate going 522 feet in the air. Did I mention I am afraid of heights?

We began our journey to the top by climbing through a small door and several portals to arrive at an elevator. The elevator literally only fit three people, squished back to front, so it was a rather cozy ride up. With no windows in the elevator, it was a relatively quick and uneventful ascension. Once the elevator went as high as it could go, we disembarked and awaited the rest of our group.
 

The last leg of our ascension consisted of climbing about 40 feet of ladder. In order to do so, we had to literally stretch our bodies into a vertical line – in other words, our arms were stretched high above our heads—so that we could maneuver through the small openings and up through the oval manhole at the top.
 

The view from the top of the Mackinac Bridge’s tower was simply breathtaking! We could see both the upper and lower peninsulas of Michigan as well as Mackinac Island. Thankfully the wind was minimal, so we were able to enjoy the view and take advantage of magnificent photo ops while we were at the top of the tower.


This was a phenomenal opportunity to travel 522 feet in the air and take in the majestic Pure Michigan scenery. I learned some interesting tid bits about the Mackinac Bridge. For example, the Mackinac Bridge spans 5 miles to connect Michigan’s lower and upper peninsula thus making it the fourth longest suspension bridge in the world. The first time traffic flowed on the bridge was November 1, 1957. At the most, vehicles can travel at 45 miles per hour while crossing the bridge.


It was a beautiful day to take in the view from the TOP of the Mackinac Bridge!

Monday, June 24, 2013

7 Habits Clip Chart

This past year the entire staff at my school underwent training in the 7 Habits. We began to implement the teachings of the 7 Habits in various areas throughout the school. One of the main things that the administrators and staff at my school are looking forward to is seeing how students can take charge of their behaviors and choices. Many of the K-3 classrooms use a clip chart similar to the one designed by Christina Bainbridge. However, we were looking for a means to tie in the 7 Habits with our behavior system. My coworker, Abby, of Third Grade Bookworm came up with the perfect solution when she had her creative juices flowing and designed the 7 Habits Clip Chart.
  
Today my Second Grade teammates and I gathered to use Christina Bainbridge’s colorful clip chart idea and combine it with the 7 Habits Clip Chart sayings that Abby penned. Here is what our final product looked like:


Before the Second Grade team gathered, I got all of the supplies. The plywood was purchased from Lowes where one of their employees kindly cut the plywood into 14 x 69 inch pieces. Here is a list of all the supplies we used to create the 7 Habits Clip Charts:
·        14 x 69 inch piece of plywood (1 per clip chart)
·        Primer
·        Spray paint (pink, purple, blue, green, yellow, orange, red)
·        Painter’s tape
·        7 Habits Clip Chart FREEBIE from Third Grade Bookworm’s store on Teachers Pay Teachers
·        Pencil
·        Tape measure or ruler
·        Mod Podge
·        Sponge brushes
·        Scrap paper
·        Drop cloths
·        Sand paper
Before we primed the plywood, we used sanders to get rid of splinters and smooth out the edges of the wood. Once the sanding was completed, we primed each piece of plywood. Then we had to wait for the primer to dry, so we took a break and caught up on what has been happening thus far this summer.

Once the primer was dry, we used tape measures and rulers to measure the various sections. The pink, purple, blue, yellow, orange and red sections are each 9 ½ inches x 14 inches. The green section is 12 inches x 14 inches.

Once the sections were measured, we used tape on the outside of the lines that designate green, purple and orange. Then we proceeded to paint each of those sections. Once those colors were on, we once again had to allow time for the paint to dry. At this point in the day, that meant we ordered lunch and enjoyed some more socializing.

After lunch, we removed the tape and went to work taping off the other sections. So as to not ruin the sections we previously painted, we covered the painted sections with paper and then used painters tape to affix it. Once all sections were taped off we painted the pink, blue, yellow and red sections. While we waited for the paint to dry we trimmed the white off of the 7 Habits Clip Chart FREEBIES.

Finally, when all the paint was dry we removed the tape and paper. Then we used Mod Podge to affix the 7 Habits Clip Chart FREEBIE to each the clip chart making sure the colors matched. For example, the green polka dot border went on the green section of the clip chart. We found that applying Mod Podge to the clip chart, then placing the clip chart saying on top of it and following that with another coat of Mod Podge helped to securely affix the sayings.

I learned two things when we created the 7 Habits Clip Charts. First, I learned that spray paint may not be the best thing to use, particularly on a humid day. Acrylic paint could have been utilized and would have dried faster than the spray paint. Second, using a small roller in lieu of the sponge brush makes it easier to ensure that the Mod Podge is applied evenly and eliminates most of the air bubbles that might occur.  
Altogether my teammates and I made eight 7 Habits Clip Charts. Since we all split the cost of the materials, it came out to about $10 per clip chart. We are so excited to utilize the 7 Habits Clip Chart in our classrooms this coming school year!


Tuesday, June 11, 2013

Science Olympiad's Final Day in Washington, DC

(NOTE: This is what we did on Sunday, June 2, 2013.)

The fourth and final day of our trip began with alarms ringing at 7 am sharp. Since everyone showered the previous night, it did not take long for everyone to get ready for another delicious breakfast buffet at the Embassy Suites hotel. This truly was a fabulous way to start off our day!
Weekend metro construction once again caused us to take a bit of a detour. Part of the red line which our hotel was located off of was being repaired and updated. This means that we had to take a metro shuttle bus to bypass the areas that were being worked on. Riding the bus was quite interesting in that it allowed us a bit of a scenic tour of Washington.
Our first stop of the day was Ford’s Theatre which is where John Wilkes Booth assassinated President Abraham Lincoln. The theatre itself was closed down in preparation for the annual Ford’s Theatre Gala so we were not able to go inside. However, we got to see the proverbial red carpet being rolled out and preparations being made for the Gala. Directly across the street from Ford’s Theatre is the Petersen House which is where Lincoln was taken after he was shot. Inside the house is the pillow still covered in Lincoln’s blood. Unfortunately, the Petersen House was also closed to visitors so we were not able to go on a tour. However, we were able to snap a group photo on the steps of the Petersen House before heading off to do a bit of souvenir shopping.


Our final DC destination was the National Portrait Gallery. Interestingly enough this was the first place we did not have to go through security lines. We simply walked in and began touring the gallery. The only thing we had to do was wear our small bags and purses on our front so as to not accidentally nock into and damage any of the artwork. Free lockers are located inside the gallery’s lobby for backpacks and other large items. In talking to all of the kids, it was unanimous that their favorite piece of art was Nam Jun Paik’s “Electronic Superhighway: Continental U.S., Alaska, Hawaii” which is essentially a neon outline of the country with televisions in each state which depict images that Paik thinks represent each state. For example, in Kansas a loop of footage from the Wizard of Oz played.

As previously noted, metro construction increased our travel time both today and yesterday. Therefore, we decided to head back to the hotel after the National Portrait Gallery to be sure we arrived in time to catch the shuttles we booked to the airport. We ended up with an hour and a half and the troops were hungry. Thankfully there was a Booeymongers right down the street from our Embassy Suites hotel. Booeymongers had delicious sandwiches, wraps and salads so there was something that met everyone’s tastes.
After assuaging our appetites, we trooped back to the hotel to collect our luggage. We had originally planned to take the metro back to the airport, but the construction would make it difficult to travel with luggage so we had two taxis shuttle us to the airport.
We arrived at the airport with plenty of time to spare so the kind folks at AirTran said we could get on an earlier flight. A flurry of quick phone calls to parents ensued to notify them of our change in travel plans. As we made our way through security and arrived at our gate we found that they had shut the doors, effectively barring us from boarding the earlier flight. This meant we had to get back on our original flight and call all the parents again to notify them that our travel plans were in line with what was initially planned.

Since we had a couple of hours to keep busy, we began by finishing up the postcards we were sending to thank family, friends and community partners for helping make this DC trip possible. Once all post cards were completed, we began spirited games of Headbandz and Catch Phrase. We even had a U.S. serviceman join in our lively game of Headbandz!
The weather in DC as well as Atlanta was stormy and therefore our flight home was delayed several times. Thankfully everyone easily passed the time with grabbing a bite to eat, journaling, and participating in various games. When we landed in Atlanta at about 11:15, we had to wait to let everyone else deplane first. Then the adults helped the students get their luggage from the overhead compartments and off we went to meet up with our rides. As we came up the escalator towards baggage claim we were greeted by the parents who came to drive us back to school.  One parent even had a delicious surprise gift bag of dove chocolates for each teacher to thank us for planning and chaperoning this trip. By 1 a.m. everyone had been picked up from school and arrived safely back in their respective homes.
As I conclude this fourth and final post about the Science Olympiad DC trip, I want to take a moment once again to thank our community partners (Chik Fil-A, Monterreys Mexican Restauraunt, Fair Oaks Soccer Club, Childress Kline Properties) as well as all of our colleagues, family and friends who made this trip possible. Thanks to you our students were able to experience many first including, but not limited to, first time flying in an airplane, first time eating in a restaurant where you sit and have your meal served to you, first time on a metro train, first time visiting Washington, DC and so on. The smiles on our students’ faces and the memories they were able to create are priceless. Your generosity enabled our kids to have this once in a lifetime experience! THANK YOU!


Saturday, June 1, 2013

Science Olympiad Visits DC: Day 3 Adventures

Our third day in DC challenged us to be flexible. One of our students sprained his ankle. Dr. Kevin wanted him to stay off of it as much as possible, so we ended up bringing a wheelchair with us today. The Metro construction and repair meant that portions were shut down, so we had to take shuttles at some points.

The first destination today was the White House. Due to heightened security, no one is able to enter the White House for tours. However, we did take some time for some photo ops so that the kids could have a snapshot of their first visit to the executive branch’s home and workplace.


Next up on our itinerary for the day was the National Art Gallery where we saw every imaginable type of art from sculptures to paintings. A vast majority of the group said their favorite piece of art was a piece by Chuck Close. It was done completely by finger-painting, using oil paints and really is quite fantastic.

                                 A painting by Chuck Close entitled "Fanny/fingerpainting."

                                             Imitating some of the sculptures ...
We ate lunch in the National Art Gallery’s cafĂ©, which enabled everyone to pick and choose their food. We snapped up a couple of tables and enjoyed a leisurely lunch before stopping off in the gift shop and then heading out to our next destination.


Georgia Senator Johnny Isakson kindly arranged for us to have an appointment for a tour of the US Capitol building. We began our tour by watching a brief movie which explained the history behind what goes on inside the Capitol on a daily basis and how it was established when our country was founded. When the movie was finished, we headed up the theatre stairs to meet our tour guide, Mr. Carb. He passed out headphones to everyone in our group so that we could clearly hear him when he was showing us around the Capitol. During our tour we learned that each state chose two statues of important, deceased people to represent their state. These statues are displayed throughout the Capital and can be changed out, but only after ten years’ time. In addition, we learned about Constantino Brumidi and how his artistic talents are represented in murals on the Capitol’s walls as well as on the vaulted or domed ceilings.
                                                      The kids in front of the Capitol.
Due to the increased difficulty of travel thanks to metro repairs we did not have time to make it to the National Gallery this afternoon. Instead we headed back to the hotel where we told the kids about a little surprise we had for them.


As a special treat, we took the kids out to dinner at The Cheesecake Factory which is located two floors below our hotel in the mall. They absolutely LOVED it! We ordered endamame and fried zucchini for appetizers so that the kids could try something they had never tasted.  Not all of them liked the appetizers, but they at least took time to sample them and expanded their food pallets in the process. Most of the kids ended up ordering a meal and sharing it with a friend or two so that they could taste multiple dishes. What was so special about our Cheesecake Factory dinner is that it was another first for some of our students who have never previously eaten in a sit-down restaurant.
Ms. Haddon and a couple of students awaiting our dinner to be served at The Cheesecake Factory.

When we wrapped up dinner, the whole crew headed up to the hotel to shower and write in their journals. Taking time to write in their journals is allowing the kids some quiet time to reflect upon what they have seen and learned throughout the course of their DC trip.
A little journaling before we played games …

After the journal writing and showers were completed, everyone gathered in one room and played games. Here are some action shots of our game infused night:


Everyone else is tucked into bed, happy as clams with full stomachs and sweet dreams ahead resting up for our fourth and final day in DC tomorrow. Good night!